Max's notebook
A collection of sorts
TIL you cannot AWS-ELB All the Things
21 Aug 2018
08.14.2019 Update: After many conversations with AWS Support, the limit of 50 listeners is now a soft limit!
A recent project of mine was to take one of the core applications at my job from hand-rolled snowflake servers to documented and repeatable infrastructure. This is meant to be a record of how I built it, what problems I ran into, and how I did, or did not, solve them, in hopes of helping someone in the future–or possibly myself the next time around.
So here we go.
WHAT IS IT?
The application in question processes and routes messages sent over via TCP streams, as VPN tunneling is the preferred method of data transport (the application can receive messages via HTTP, but only a few customers deliver their data this way).
WHY WAS IT HARD?
- AWS Load Balancer limitations
- Replacing the load balancer
- Fail over
HOW’D YOU DO IT?
Step One: Get a clean and reliable installation of the application
Nothing crazy, CloudFormation for infrastructure provisioning, Chef for configuration management, and Artifactory for artifact storage. Small highlight: the vendor doesn’t support running this application as a non-privileged user, and getting to the point where that was made clear took a very, very long time.
Step Two: reliably provision the database
Manual schema and user creation for the win. As far as I know, there isn’t a way to include database provisioning as a part of CloudFormation–once the RDS instance was created, we had to connect to the db and create the relevant schema and users. There is a possibility of addressing this by having the database master user/password used by the application, but I chose against this in the name of separation of concern.
Step Two-and-a-half: Provide new db details to Chef
The urls and passwords are created at runtime, so they can’t be passed to Chef in advance to allow for a more ephemeral approach.
Step Three: Load balancers
Shouldn’t that be part of step two? Aren’t you using AWS, so can’t you just use one of the Elastic Load Balancers? No. No I cannot. Even though that was the design provided by the vendor, still, I cannot. This is where I hit the first major issue: AWS load balancer limitations. The application requires port-driven routing: client one on port 9001, client two on port 9002, client two sending data type two on port 9003, etc, etc, etc. The AWS load balancers max out at 50 port-bound listeners, effectively supporting less than 50 clients. I have defeated the purpose of a load balancer when I go down the path of having multiple load balancers for the same application, each with their own configurations. As a replacement, I chose HAProxy, which supports load balancing TCP streams and is simple to configure (!).
After much research and fighting with embedded ruby and help from a very, very patient former coworker (Thanks Andrew!) I was able to use Chef to build a config for HAProxy that let me store client-specific configurations and application nodes in JSON:
node['maxs_haproxy']['clients'] = [
  {
    "client_name": "client_one",
    "client_port": 9001
  }
]
node['maxs_haproxy']['app_nodes'] = [
  {
  "app_node_name": "node_one",
  "app_node_ip": "192.168.0.1"
  }
]
Hooray! I have a load balancer! It’s easy to manage the config! I know what’s what! This is great! I’m going home! I did not go home.
Step Three-and-a-half: Provide new load balancer and application instance details to Chef
Ips are created at runtime as well, can’t be passed to Chef in advance.
Step Four: How do I Fail Over?
I’m using a software-defined load balancer instead of one provided by my IaaS provider, and I don’t want a single point of failure. After some reasearch, I found that using keepalived for fail over with HAProxy is a popular pattern, but there were two issues I kept coming across while trying to set this up:
- managing master/backup state (the nodes have to be self-aware) and IP addresses (the nodes have to be other-aware) for configuration at infrastructure provisioning time
- understanding how fail over and recovery work in keepalived
Managing state – IPs change when you bring up new nodes (I didn’t want to hard-code the IPs in CloudFormation), so how do you manage dynamic ip addresses that directly impact application configuration? How do I know what the IP of my master AND backup node is at provisioning time, so this info can be passed to each node and keepalived can be configured correctly?
I don’t think I solved it the best way, but here’s what I did: during infrastructure provisioning, I assigned master/backup state to the nodes via Chef roles, and added the IPs as attributes to the Chef server, allowing the nodes to properly configure keepalived.
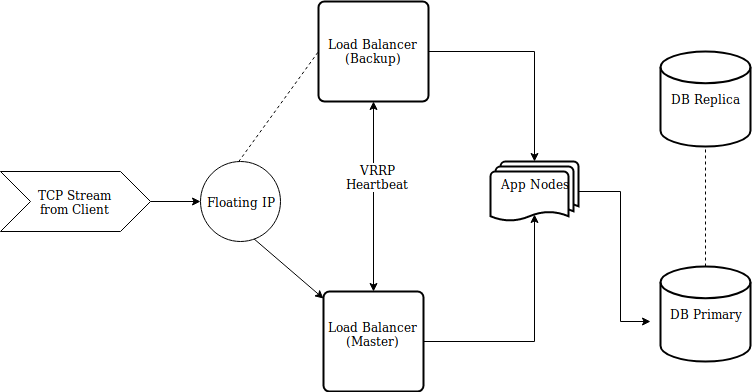
Failing over – keepalived can use VRRP as a heartbeat between nodes, checking to make sure that the master node is up and running. If the master isn’t available, or declares a failed status check, the backup will designate itself the master node, and run a script containing whatever application logic is required.
There are lots of tutorials and examples of keepalived configuration, but one thing that I kept missing (or that wasn’t in the guides I found), was the link between the health check and priority.
The initial state of a node is master or backup, and each is given a priority value, commonly 150 for the backup, and 151 for the master.
I didn’t realize that the health check should be weighted as well, allowing for a failed check to change the priority value of a node, along with changing the master-backup state.
This kept me stuck in a state where I could not recover to my master node, even when it became healthy again.
How it looks at the end
Room for improvement
- Service discovery to handle master-backup state assignment and transfer